Posts

Showing posts from 2017

Nintex Workflow for O365 - Get Manager Email Address

Image
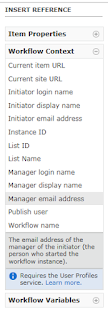
What Nintex Workflow in Office 365 is different from On-Premise, so here's how you can grab a manager's email address. Why If you want to assign a task or email the manager of the person who submitted an item. How Click in the Text Box you would like to add the email address to and using the right-hand navigation menu select Workflow Context > Manager Email Address Reference: https://help.nintex.com/en-US/O365/o365/O365WorkFlow/CreatingWorkflows/Lookups.htm

Office 365 - How to Link Directly To A Users Delve Profile With Email Address

What You've probably seen it before, when you navigate to a persons Delve profile in Office 365, the URL contains a unique UserID. Example: https://aus.delve.office.com/?u=xxxxxxxx-xxxx-xxxx-xxxx-xxxxxxxxxxx$v=work Well there is a way to create a link that will send you to a users Delve profile based on their email address Why You may want to programatically show a list of users and link to their Delve Profiles. How The link below allows you to input an email address at the end, Office 365 will automatically translate this and re-direct you to the Users Profile https:// [TenantName] -my.sharepoint.com/PersonImmersive.aspx?accountname=i%3A0%23%2Ef%7Cmembership%7C [EmailAddress]

PowerApps - Default SharePoint People Picker Field To Be Logged In User

Image
What When you're building a PowerApp connected to a SharePoint List Form and you would like to capture the details of the person who is filling out the form. Why I understand that this is already captured via the 'Created By' SharePoint System field, but sometimes customers like to capture requestor name, phone, etc on the form itself rather than having to go to SharePoint to view it all. Assumptions: You've already created a PowerApp and added a 'Form' Control that uses a SharePoint List as a Data Source. Your SharePoint List contains a People Picker Field How To pull back details about users, add another Data Source: View  Tab > Data Sources > Add Data Source > Office 365 Users Click on the Card in the form that contains your People Picker Field Go To Advanced and click 'Unlock to change properties' so that you can select the field itself Click on the People Picker Field itself, then select the 'Default'

Deleting an Office 365 Group Deletes your Yammer Group

Image
Even if the Yammer Group was created first... So yeah, don't delete O365 Groups unless you want everything gone. If you need to recover: ##Do this off Network with regular powershell opened as Administrator Import-Module AzureADPreview Connect-AzureAD Get-AzureADMSDeletedGroup | Out-GridView Restore-AzureADMSDeletedDirectoryObject –Id xxxxxxxxxxxxxxxxxxxxxxxxxxxxxxx Get-AzureADGroup –ObjectId xxxxxxxxxxxxxxxxxxxxxxxxxxxxxxxx Update - 08/12/2017 Microsoft are rolling this restore functionality into Exchange Online over the next month or two, so you wont need the script above soon:

SharePoint Online - Share or Copy Link Button Defaulting to 'GuestAccess' Link

Image
What Ever tried to copy or share a link in SharePoint Online and it defaults to providing you with a Guest Link that is 'accessible to anyone in the organization'? It's a really good option for staff that want to quickly share a document without having to understand SharePoint Permissions. Unfortunately, the Guest Access Link forces the user to open up the document In-Browser using Office Online.  I personally can't abide this until the functionality between Online & Client are 1-to-1. How to Fix SharePoint Online defaults the Sharing settings for copying & sharing links to "Internal - People in the Organization Only' , which basically means 'Guest Link that opens in browser'. To change this you just need to go to: SharePoint Administration Center Sharing Tab Change the 'Default Link Type' setting from 'Internal' to 'Direct - Only people who have permission' Done!  No more links with 'guestaccess.

SharePoint Online - Hide External Users from Global Search Results

Image
Had a problem where external users (people outside our organisation who had been provided with an anonymous link to OneDrive/SharePoint Documents) were showing up in SharePoint's People Search Results. This article explains how to fix:  https://englando.wordpress.com/2015/07/24/hiding-users-from-office-365-sharepoint-global-search-results/ Basically you need to add a Query Rule to SharePoint's 'Local People Results' Search Query to block out results that contain the external users. I personally filtered out all results where a persons Username contained ' #EXT#' , which is what gets appended in Office 365 whenever an external user is given access to a document.

SharePoint Online - Automate Site & Group Creation with Nintex Workflow O365

Image
What Nintex Workflow for O365 has an action to create a site automatically in SharePoint, but it's functionality is quite limited.  You can't create groups and you can't add staff to those groups.  This tutorial shows you how to create a Nintex workflow to automate the whole process using SharePoint Web Services. Even better, we are going to create the ability to automate Site Creation across multiple Site Collections. If you're looking for a tutorial on how to do this in Nintex Workflow 2010/2013, I've written an article here:  SharePoint 2010 - Automate Site & Group Creation with Nintex Workflow 2010 Why As most SharePoint administrators are aware, it's ALWAYS a bad idea to give staff the ability to create SharePoint sites.  They will end up creating them for the wrong purposes, will not maintain them, no retention policies will get assigned to them, etc. However, you don't want to restrict your users creative freedom.  You want to govern it

SharePoint Online - Retrieve the Permission Mask Values for a Site using Powershell

This article stems from another article explaining how to [[Automate Site & Group Creation with Nintex Workflow O365]] - Coming Soon What Use Powershell to retrieve detailed data about the permission levels on a particular site Why I had previously created a Nintex Workflow to Automate Site & Group creation using nintex workflow on SharePoint 2010 .  I needed to recreate the same workflow in SharePoint Online / Nintex Workflow O365, however the SharePoint 2010 script for retrieving Permission Mask values did not work. How Using Powershell 3.0 or later, and SharePoint Online Powershell Module.  Open up the SharePoint Online Powershell Module and paste the following code (after updating the variables at the top for your site and admin details): # SharePoint Online - Retrieve the Permission Mask Values for a Site using Powershell # Specifies variable $AdminURI = "https://company-admin.sharepoint.com" $RootSiteCollection="https://company.sharepoint.co